FRONT OFFICE
Once the guest completes the hotel check-in process, the front office executive should inform the guest about the multi-lingual mobile application and guide the guest to scan the QR Code displayed at the front desk. Refer the image below)
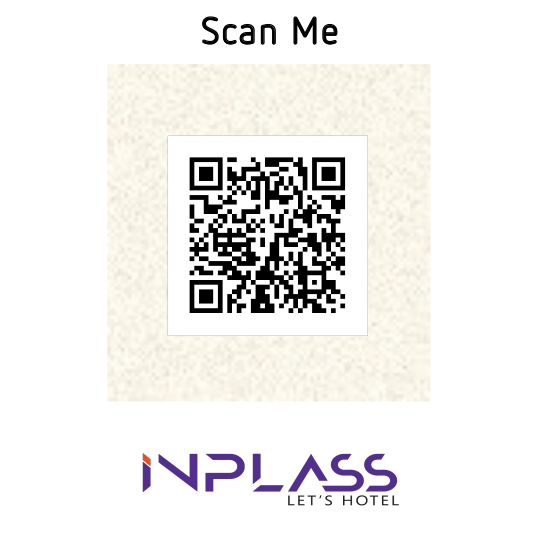
After the guest scans the QR Code and submit the details such as guest name, booking reference, room number. The guest request will appear in the guest list on the Front Office terminal followed by a push notification to front office staff. The Front Office staff on duty has to verify the guest details and accept the guest.
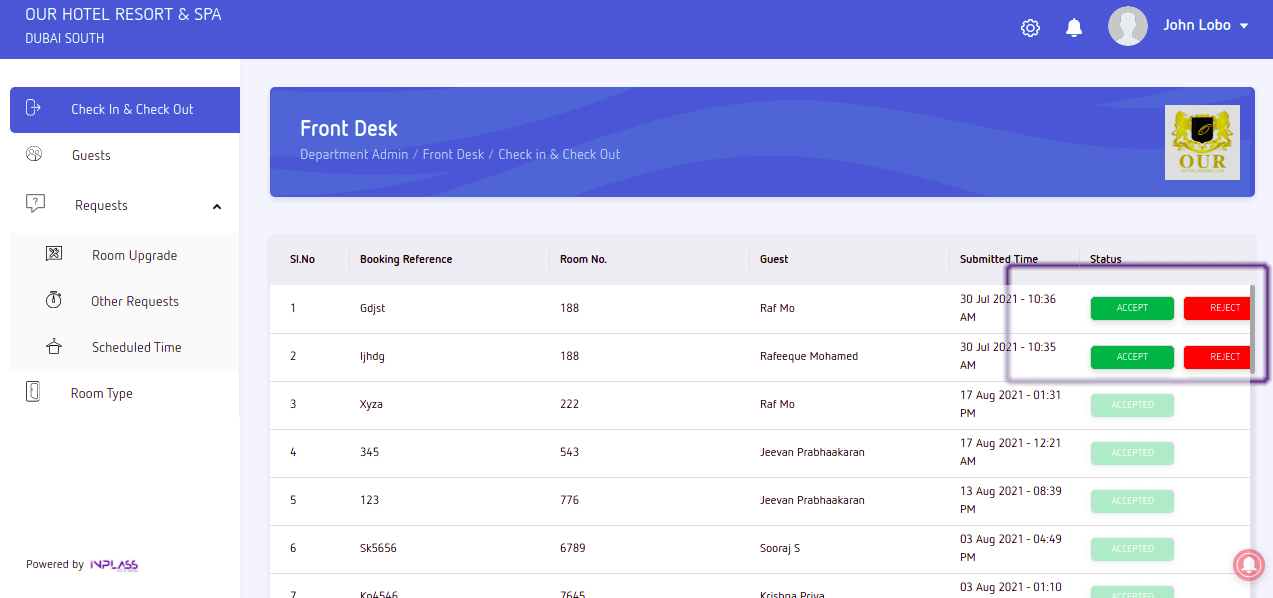
The guest can start using the Mobile Application, once he is accepted by the front office staff and send all Hotel related service requests from their SmartPhone. (Refer the image below)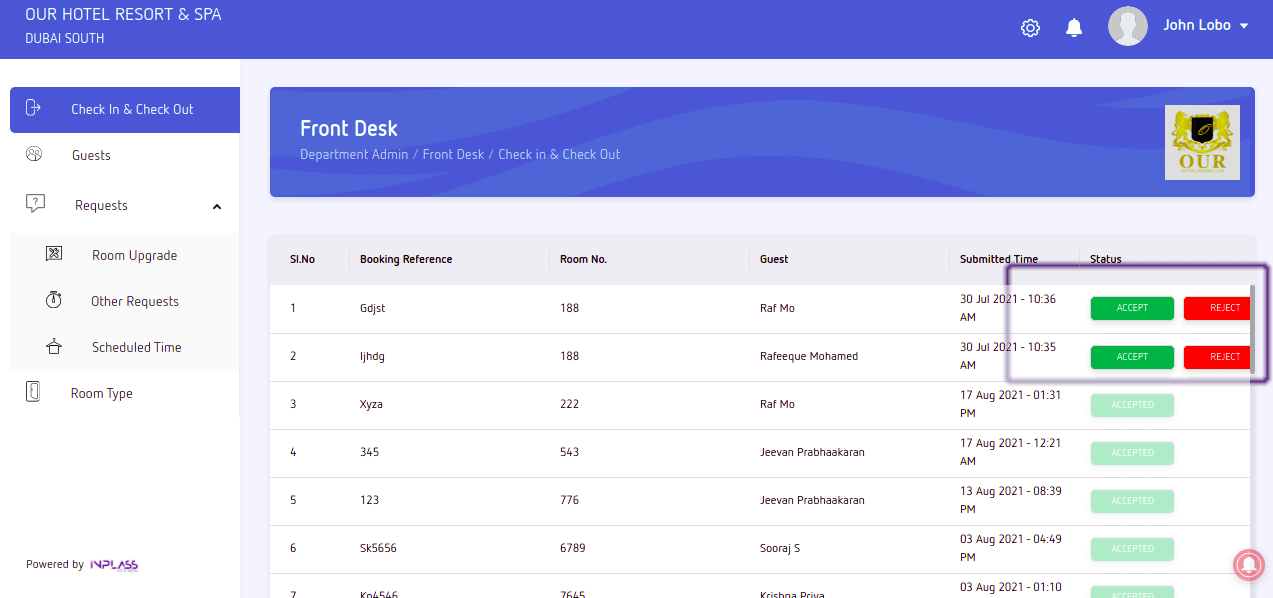
Inplass check-in is a simple process that allows guest to use the Mobile Application. The guest can start using the Mobile Application by scanning the QR Code and submit the details such as guest name, booking reference, room number. The guest request will appear in the guest list on the Front Office terminal followed by a push notification to front office staff. The Front Office staff on duty has to verify the guest details and accept the guest. Once he is accepted by the front office staff and send all Hotel related service requests from their SmartPhone. (Refer the image below)

The guest request to use the Mobile Application will appear in the guest list on the Front Office terminal followed by a push notification to front office staff. The Front Office staff on duty has to verify the guest details and accept the guest. Once he is accepted by the front office staff and send all Hotel related service requests from their SmartPhone. (Refer the image below)
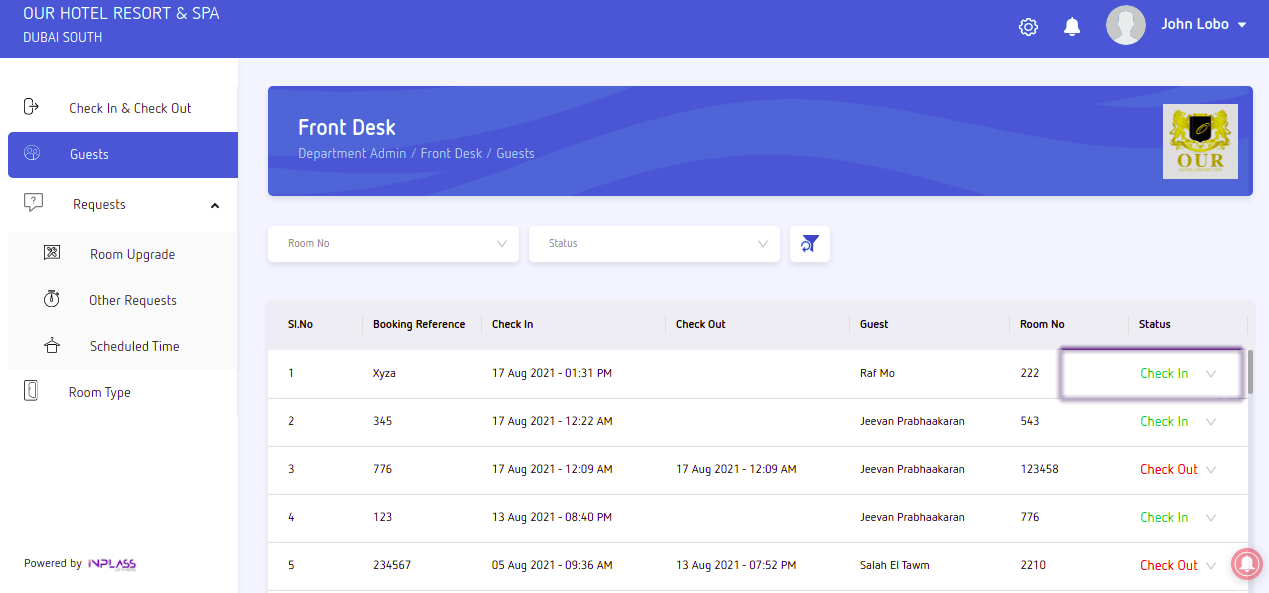
Inplass check-out is a simple process that revokes guest permissions to user the Mobile Application after the actual check-out. As shown in the image below select the guest from the grid and pull the status drop down and change the status to “Check-out”. (Refer the image below)
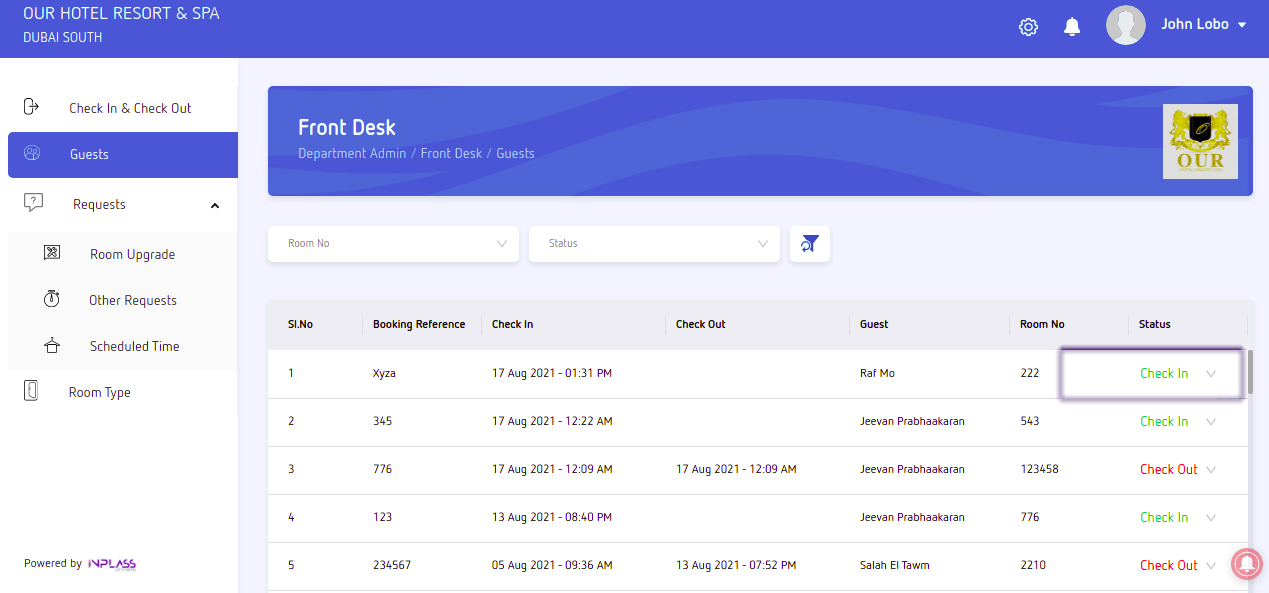
The list of guest using the mobile application can be accessed by Front Office by clicking on the “Guests” TAB on the left menu.
The Front Office staff can change the guest status to “Check-out” from this menu. (Refer the image below)
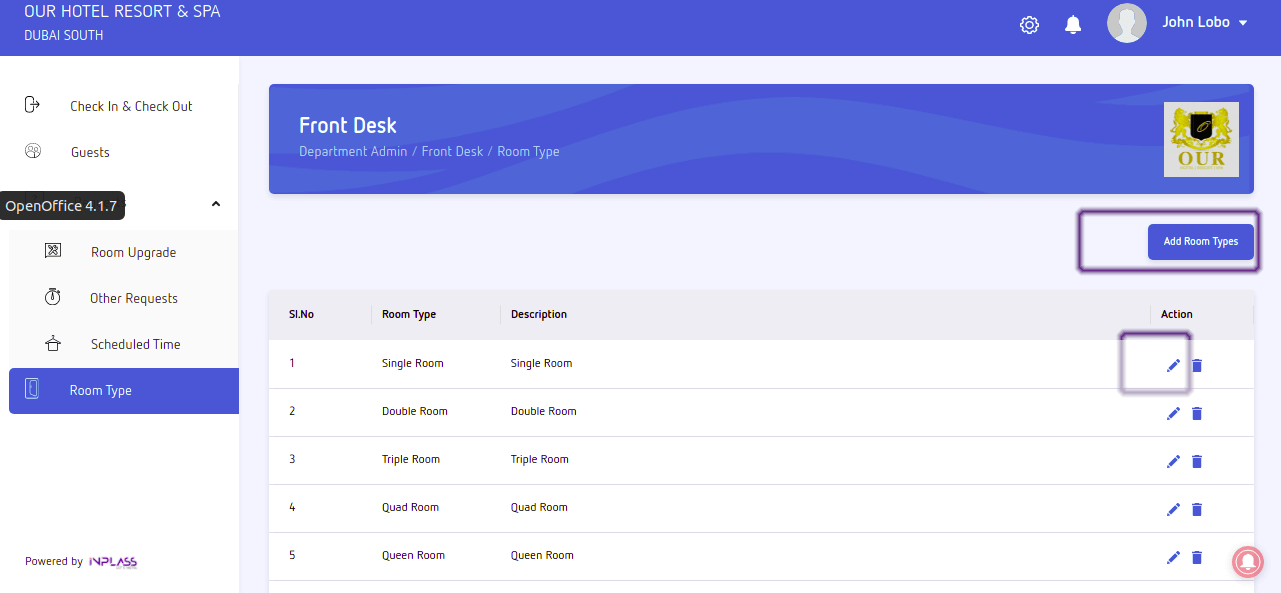
Room Types are category wise description of rooms available in your Hotel. The Front Office staff can setup Room Types and add a description of the facilities and amenities available in the room.
Sample Room Types:
- Standard Room
- Deluxe Room
- Suite Room
- Family Room
To add / edit Room Types click “Room Types” TAB on the left menu and click the “Add Room Type” button or click the pencil icon in the grid to edit the “Room Types” (Refer the image below)
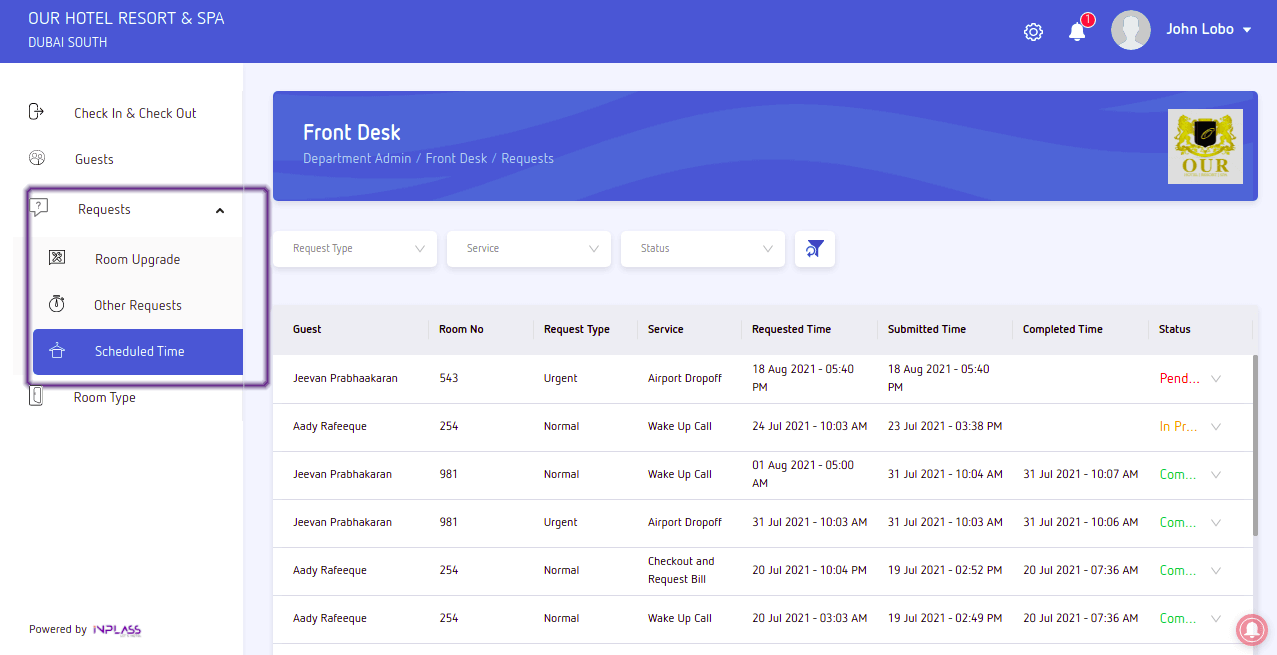
Front Office staff can view the Guest requests from the Front Office Terminal / Tablet / SmartPhone by login to the Front Office module.
All Guest requests to Front office can be viewed from Request TAB on the left menu. There are 4 categories of requests coming to front office staff.
- Guest request to use the App
- Room Upgrade
- Change / Upgrade Room
- Other Request
- Extra Bed
- Doctor on Call
- Extend Stay
- Check-out Request
- Schedule Time
- Wake-up Call
- Airport Drop off
To change your preferred language of Front Office Application, click the drop down icon near your name on the top right corner. Select “Language” from the drop down list, then select your preferred language in change language pop-up window and click apply button to set the language.
To add / change your profile picture, phone number and designation, click the drop down icon near your name on the top right corner. Select “My Profile” from the drop down list and click on Edit button to upload your photograph and update your designation and phone number.
ADD TITLES & PERMISSIONS
Titles & Permissions in INPLASS web application allows the administrator to set user level access privileges at module levels (for example, the Hotel Administrator can decide staff level access to Front Office, Housekeeping, Food & Beverages etc.)
The Hotel Administrator can set user level access privileges based on the staff designation and assign these Titles & Privileges to the staff user. Once the staff users are assigned with these Titles & Privileges, they will be able to see all requests from the Hotel Guests based on their set privileges.
Titles & Permissions in INPLASS web application allows the administrator to set user level access privileges at module levels (for example, the Hotel Administrator can decide staff level access to Front Office, Housekeeping, Food & Beverages etc.)
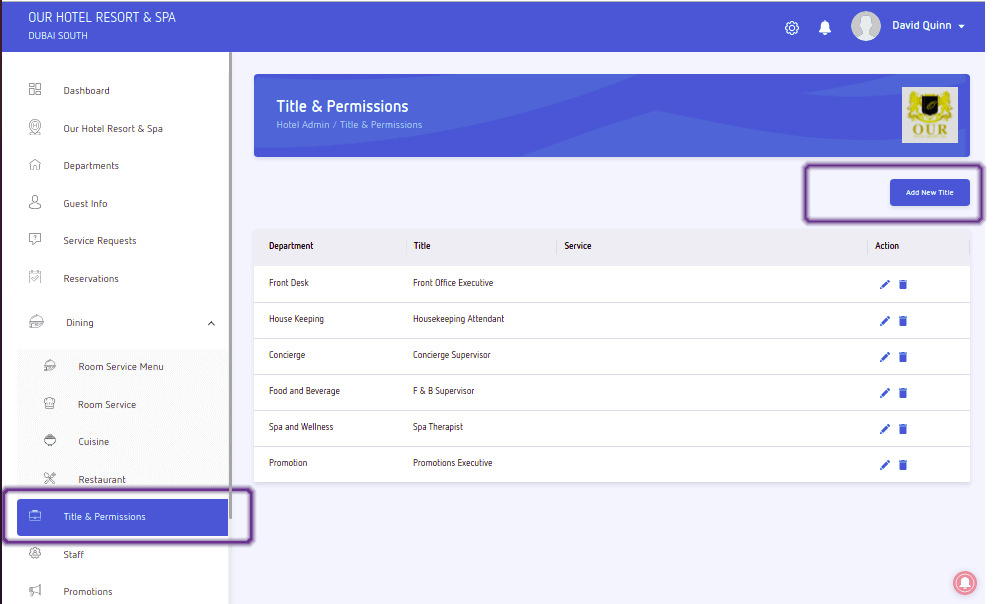
The Hotel Administrator can add Titles & Permissions in INPLASS web application from “Titles & Permissions” TAB in the application menu on the left side.
Click “Titles & Permissions” TAB; this will show you all existing Titles & Permissions and click “Add New Title” button on top right of the Titles & Permissions page to add a new title.(see the screen shot).
Titles & Permissions are assigned while adding / updating a staff. While adding a staff select the department to which the staff is associated and from the “Titles & Permissions” drop-down select the required option and click the submit button. INPLASS application will assign the staff with access privileges based on the set “Titles & Permissions”.
ADD A STAFF & USER
The Hotel Administrator can add a Staff in INPLASS web application from the “Staff” TAB in the application menu on the left side.
Click “Staff” TAB, on the right hand side the information’s of existing staff will be displayed. Click Add New staff icon (see the screen shot).
Once the Staff is added, make sure the status of the Staff is set to Active, then only the user will be able to Login and use the application.
Once a new staff is created, the concerned staff will receive an email from INPLASS web application on the registered staff email ID. The staff need to click on the link in the email to create his password and verify the email using the OTP.
The Hotel Administrator can also Search / Edit / Delete / Deactivate Staff User from the Staff Page
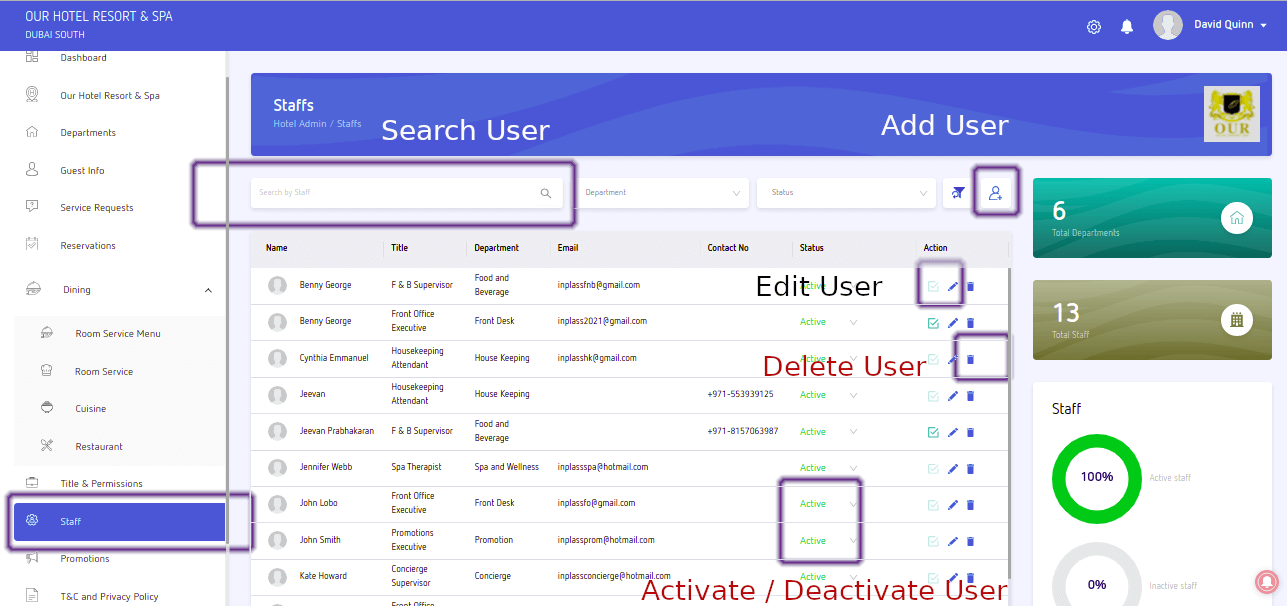
Step-1: If the staff user have not received the account verification email, check your junk / spam mail and if they found the email mark the email “as not a junk / spam”. Thereafter the staff user can click the link in the email to set the password and continue to verify the email using the OTP. Upon successful completion of verification the staff user will be able to login to INPLASS web application.
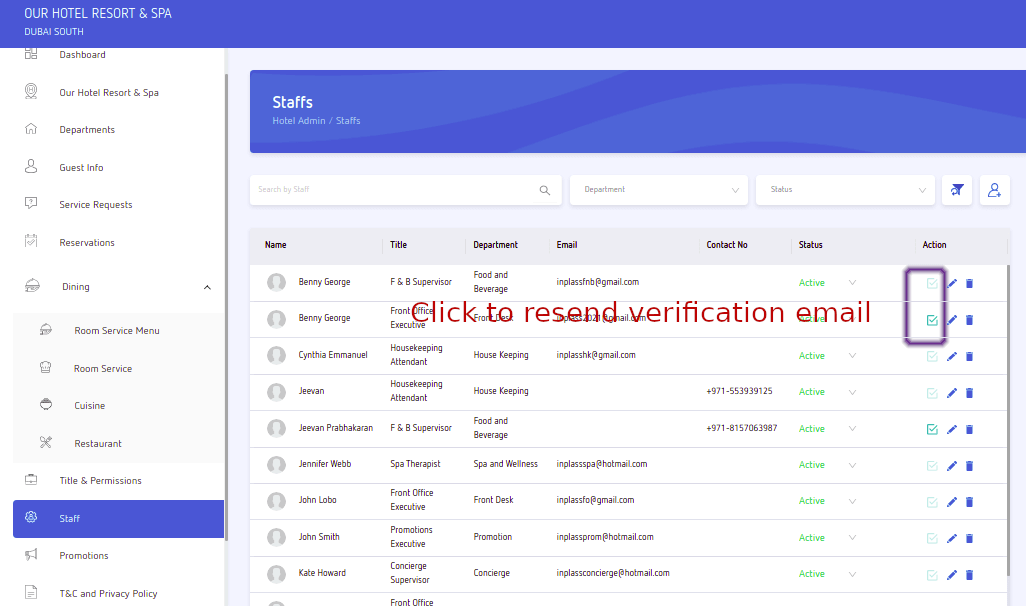
Step-2: If the staff user have not received the account verification email, and if they are not able to find the email in junk / spam folder. The Hotel Administrator should resend the email from the actions button in the staff page. (see the image below)
Step-3: If the staff user is not able to see the account verification email in junk / spam folder, even after resending it, Email Us
To Edit a staff user click on the pencil icon in the staff row, do the necessary changes and click the submit button.
To Delete a staff user click on the trash icon in the staff row, and click the delete confirmation button.
The Hotel Administrator can Activate / Deactivate the Staff User from the status drop-down in the staff display grid. Deactivated staff will not be able to access the web application.
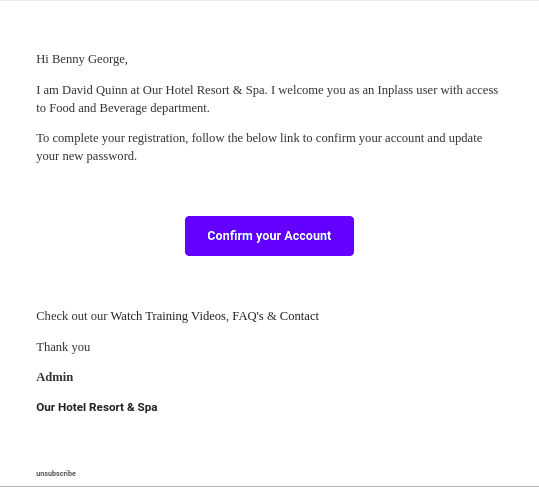
Once a new staff is created, the concerned staff will receive an email from INPLASS web application on the registered staff email ID. The staff need to click on the link in the email to create his password.
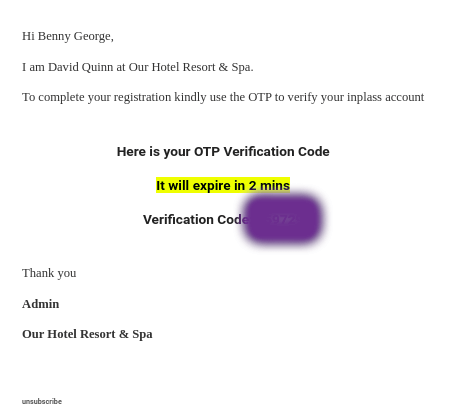
After creating the password the staff user will receive an OTP from INPLASS web application on the registered staff email ID, the staff should use this OTP to verify their email ID. Upon successful verification, the staff can login to INPLASS web application.
Sample Email Message to set staff password
Sample Email Message to Verfiy Staff Email ID using OTP
After adding the Staff user, make sure the status of the Staff is set to Active, then only the staff user will be able to Login and use the application.
Hotel staff can change the password by, clicking the “Forgot Password” link in the Login screen, as shown in the image below. You have to Enter your registered Email ID/Phone Number to receive a password reset link. You will be able to reset your password by clicking the password reset link.
ADD ROOM SERVICE MENU
The Hotel Administrator can add /edit / delete Room Service Menu from the application menu on the left side. Scroll down the left side menu and locate and click “Dining > Room Service Menu” TAB. This will open the Room Service Menu Page.
The user gets six buttons (Breakfast | Brunch | Lunch | Dinner | Meals of the Day | Add Menu) on the top of the display grid to customize the Room Service Menu as per the Hotel Requirements. (Refer the image below).
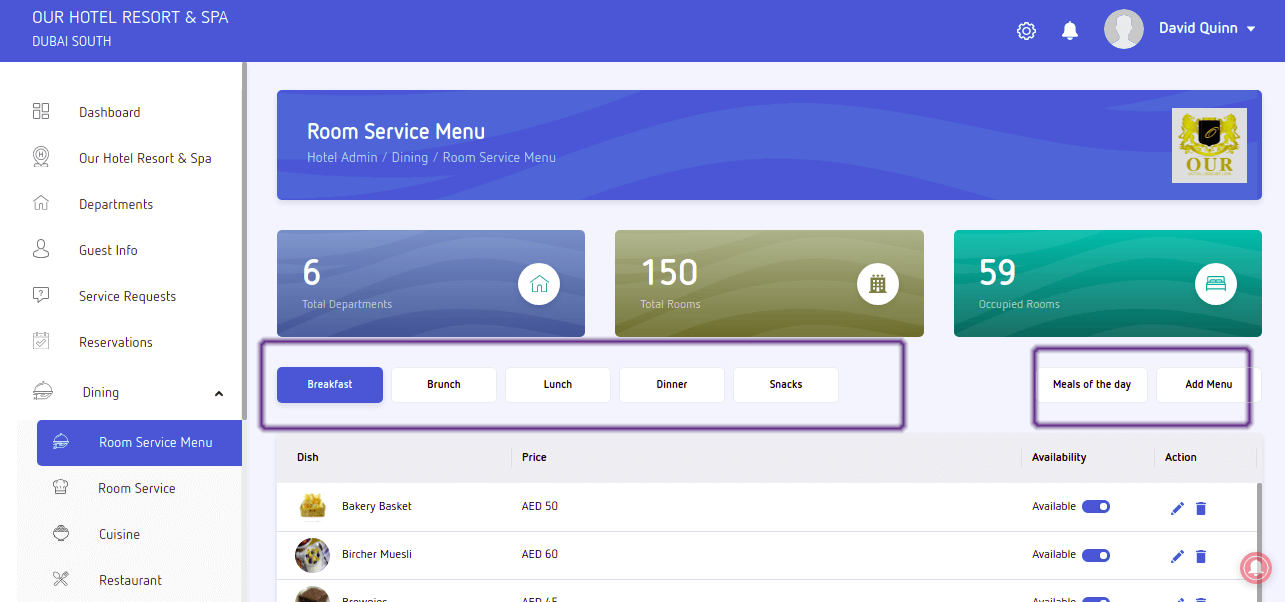
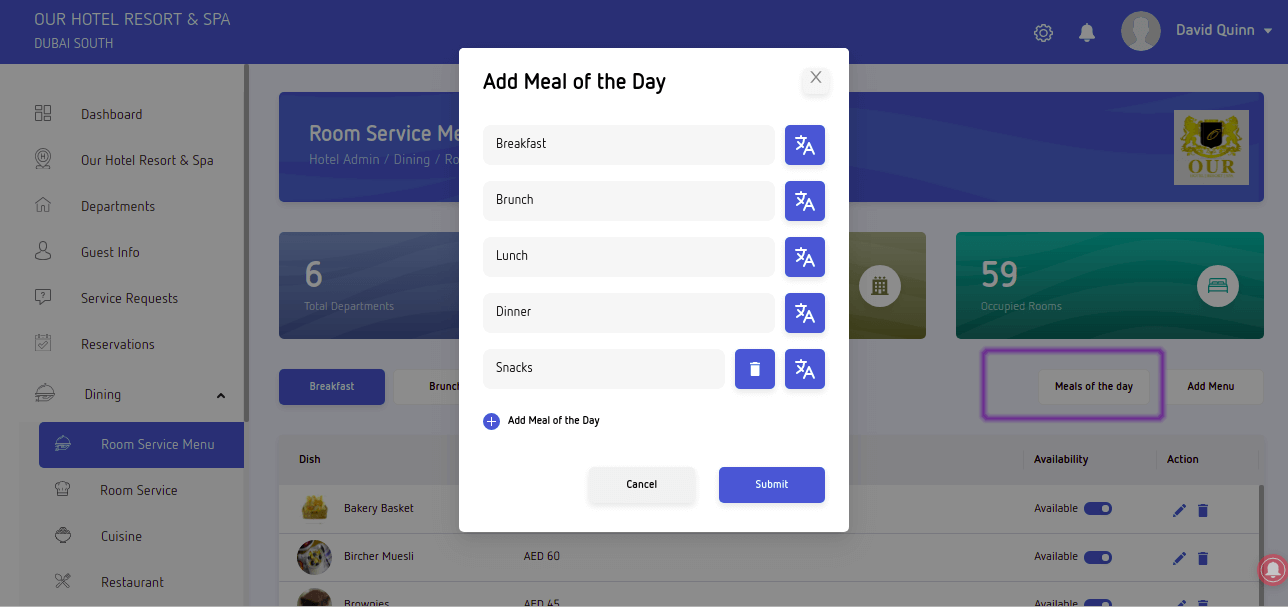
Click the “Meals of the Day” Button to customize the type of meals served in the hotel (for eg: Breakfast, Brunch, Lunch, Dinner or Starter, Main Course, Desserts, Soups, Fresh Juice, Hot / Cold Beverages).
User will be able to see Breakfast, Brunch, Lunch, Dinner by default, click the button “Meals of the Day” to change the type of meals and you can also add 3 more customized meal type served in the hotel (Refer the image below).
This module is multi-lingual and will be auto translated from English to 12 other languages in the current release.
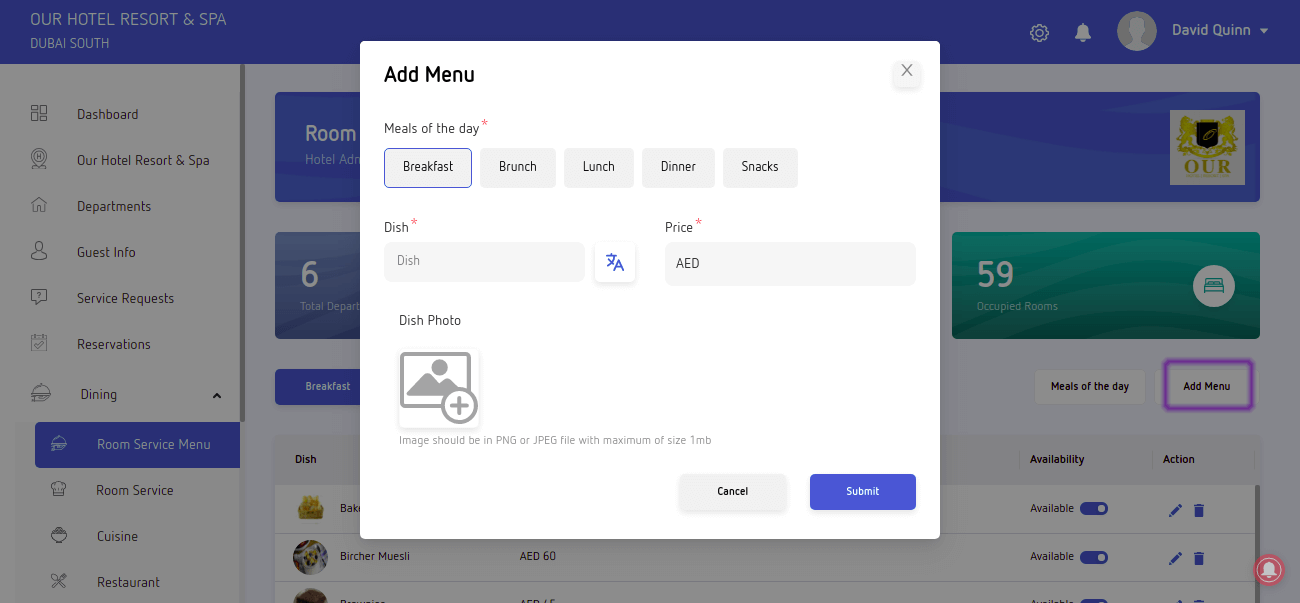
The Hotel Administrator can add dish names served in-room. Dish names can be classified as (Breakfast, Lunch, Dinner, Starter, Main Course etc.). The user can select the type of dish (for example, breakfast, lunch etc.) and add the dish name, price and attach image of the dish.
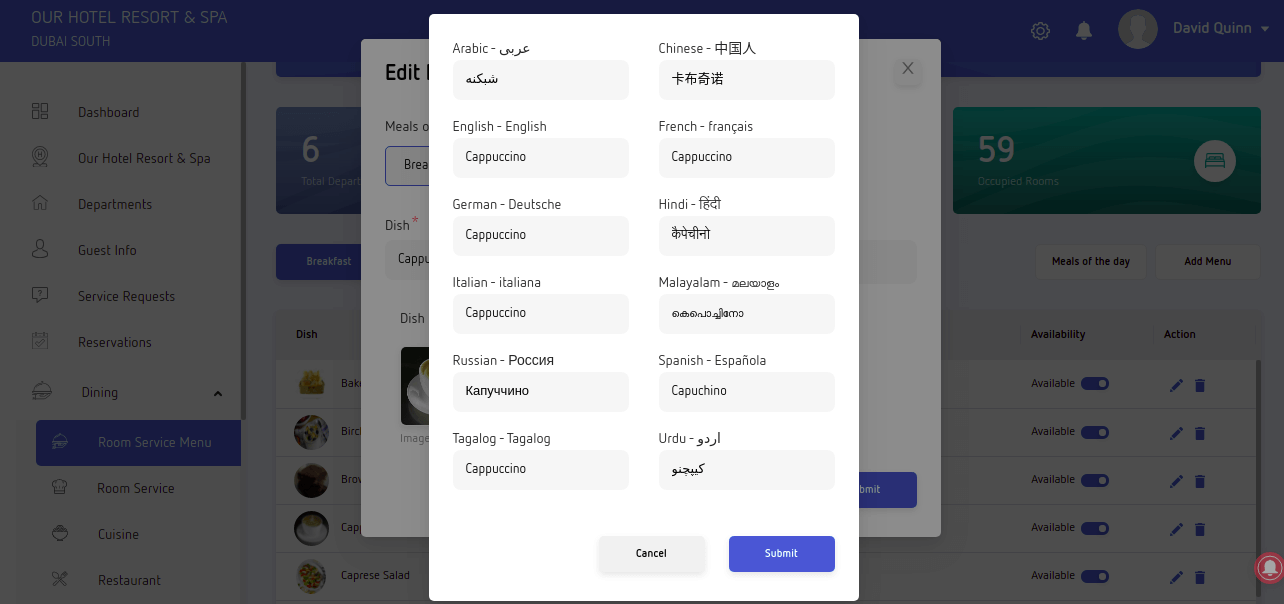
This module is multi-lingual and the dish name will be auto translated from English to 12 other languages in the current release. (Refer the image below)
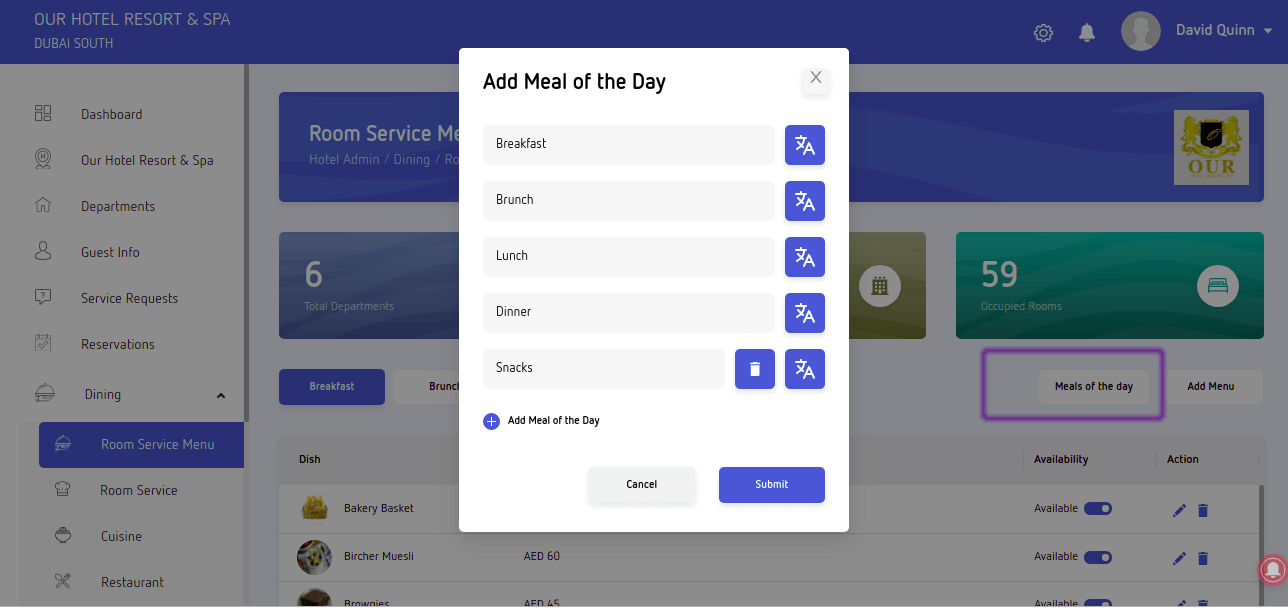
The Hotel Administrator can add /edit / delete Meals of the day from ““Dining > Room Service Menu” on the left side of the application. Scroll down the left side menu and locate and click ““Dining > Room Service Menu” TAB. This will open the Room Service Menu Page.
The user gets six buttons (Breakfast | Brunch | Lunch | Dinner | Meals of the Day | Add Menu) on the top of the display grid to customize the Room Service Menu as per the Hotel Requirements.
Click the “Meals of the Day” Button to customize the type of meals served in the hotel (for eg: Breakfast, Brunch, Lunch, Dinner or Starter, Main Course, Desserts, Soups, Fresh Juice, Hot / Cold Beverages).
User will be able to see Breakfast, Brunch, Lunch, Dinner by default, click the button “Meals of the Day” to change the type of meals and you can also add 3 more customized meal type served in the hotel (Refer the image below).
The Hotel Administrator can add dish names served in-room. Dish names can be classified as (Breakfast, Lunch, Dinner, Starter, Main Course etc.). The user can select the type of dish (for example, breakfast, lunch etc.) and add the dish name, price and attach image of the dish.
This module is multi-lingual and the dish name will be auto translated from English to 12 other languages in the current release. (Refer the image below).
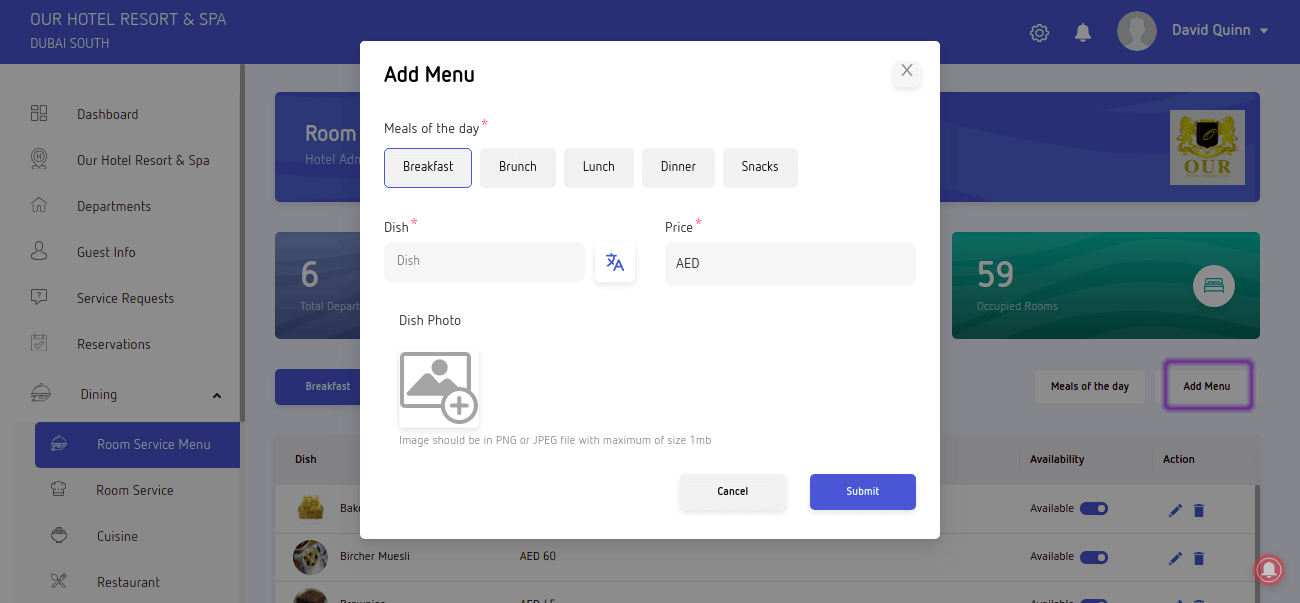
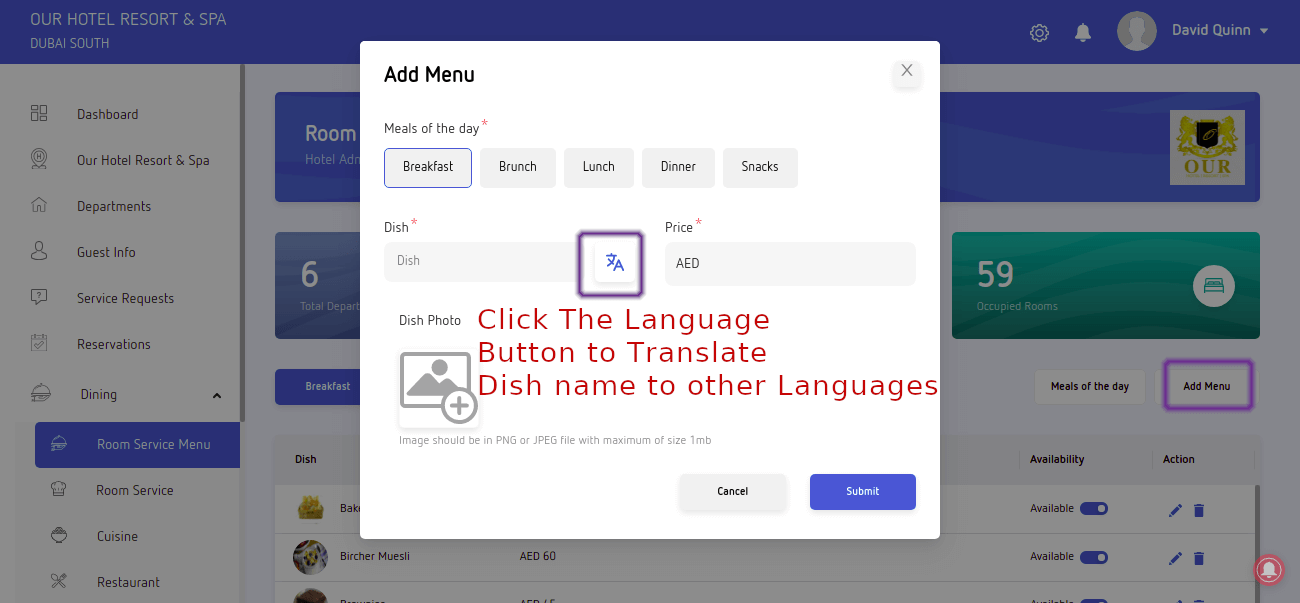
To add a dish name in multiple languages click the button “Add Menu” in “Room Service Menu” page. The user gets a pop-up window to add dish name. Type the dish name in English and click the language button to translate the dish name from English to 12 different languages. (Refer the image below).
ADD CUISINE
Cuisine is related to Restaurants in the Hotel, to add a restaurant it is mandatory to have the cuisine served in the restaurant. A Restaurant can have multiple cuisines as well.
To add Cuisine click “Dining” TAB on left menu and scroll down to Cuisine and select Cuisine. This will open up the Add Cuisine page, click on “Add Cuisine” button on top right side of the page. You will be able to select Cuisine Name from the drop down and enter a description for the Cuisine, then click “Submit” button to save.
Note: Without adding Cuisine served in the restaurant, the Hotel Administrator will not be able to add a restaurant.
ADD RESTAURANT
The Hotel Administrator can add Restaurant from the left menu “Dining > Restaurant”. Click “Dining” TAB on left side menu and select “Restaurant”, this will open the Restaurant page and click “Add Restaurant” on top right side of the page..
Add the Restaurant details as shown below:
- Restaurant Name
- Cuisine (Select multiple)
- Opening Time
- Closing Time
- Restaurant Description
- Floor (location of restaurant in the hotel)
- Number of Seats
- Dress Code
- Upload Restaurant Images
After updating the above details click the “Submit” button
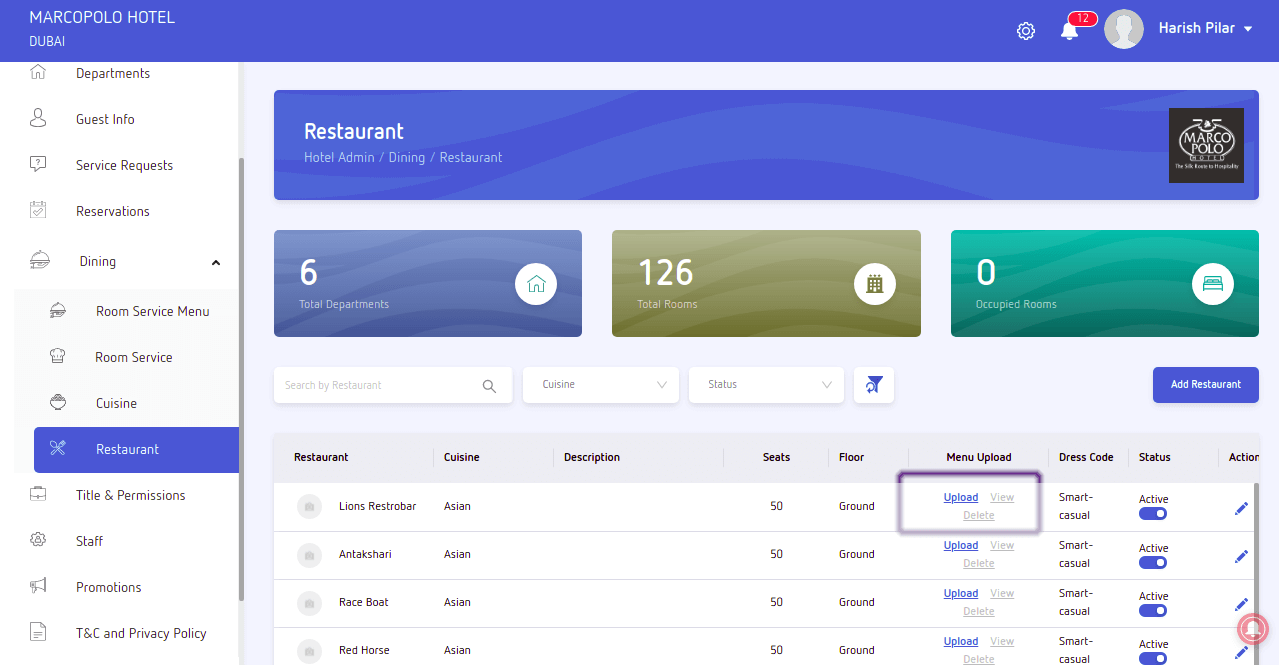
The Hotel Administrator can add Restaurant Menu from “Dining > Restaurant”. Click “Dining” TAB on left side menu and select “Restaurant”, this will open the Restaurant page and list all Restaurants. The Hotel Administrator can upload (jpeg, png, jpg files) by clicking the “Upload” link under the menu upload column. (Refer the image below).
ADD PROMOTIONS
The Hotel Administrator can add Marketing / Promotions content from left side menu scroll down to bottom of left menu and click “Promotions” TAB, to open the Promotions page. Click the “Add Promotion” button to add new promotions. Also upload a beautiful image of the ongoing promotions in your hotel.
Note: Image should be in PNG or JPEG file with maximum of size 1mb with dimension 190 x 85 pixels.
